Wednesday, August 26, 2015

An Update, and my surprise!

Hello, Dear Reader,

Thank you for looking in!

I'm just taking a "bloggy minute" to say hello.

We will have to disconnect from the internet for a day or so, as we are having work done in the house,  including windows and door replacement, and we don't want the guys tripping over the wire as they work. I only mention this as I will not be able to visit your blogs or reply to any comments for a day or so.

I will be back on line as soon as possible!

**********

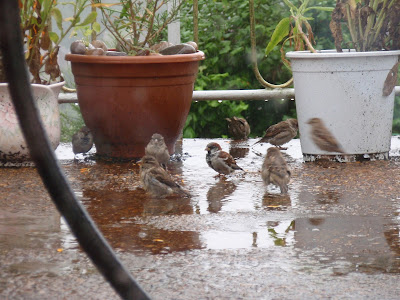
I wanted to take the opportunity to show you a few pictures of some lovely sparrows enjoying the puddles on our terrace, yesterday.

They always look as if they are having such fun, splashing about in the water, obviously washing! If you click on the photographs you may be able to see the sparrows better.

Happy sparrows 1

Happy sparrows 2

Happy sparrows 3

Happy sparrows 4

Happy sparrows 5

Happy Sparrows 6

Happy sparrows 7

Happy sparrows 8


We have about six bird baths (although four of them are only plastic bowls on the lawn), and three ponds of different sizes (two are quite small, and are only the preformed fibreglass type that my husband dug in some years ago), but what they love most is splashing about in the pooled water on our terrace when it has rained heavily.  It seems that they are such social creatures as they all turn up in a group of at least a dozen and splash about together.

**********

I recently had a marvellous surprise when I won Sheryl's very generous Giveaway.  I was so delighted!  I had only recently discovered her blog through Super Mom - No Cape's Stitchery Party (link button in my side-bar), and didn't think I could possibly win her beautiful pouch, but I made my comment, and luck was with me, as against all odds I was fortunate enough to win her lovely original gifts.

Yesterday her envelope flew literally through our open doorway, and landed with a satisfactory plop in the hall. I immediately thought at first "Gosh, it must be airmail!". The door is currently open almost all day as our two workmen, replacing our door and windows, are continually going in and out.

I took these photographs of Sheryl's Giveaway items, in my excitement when her parcel arrived:

Sheryl's giveaway
Package as it arrived by "Airmail" in the hall - please excuse black plastic
protective coating on the floor whilst works are under way.

Sheryl's giveaway
And such beautiful wrapping, one of my favourite colours too!

Sheryl's giveaway
When I received the parcel I realised the flowers have all been outlined with
 blue thread, and have the most gorgeous little pearl beads in their centres.

Sheryl's giveaway
I can't tie a bow like Sheryl!

Sheryl's giveaway
The package included 2 sweet bobbins of lace, 1 of patterned ribbon, beads and
 threads.  You can also see the pouch's satin lining in this view.

Sheryl's giveaway
Sheryl also very kindly included a fat quarter of her toile de jouy.

I am so happy to receive these and am already planning something I can make with them.

**********

As you might imagine, with all the building work in progress, there is no stitching going on here at the moment!

Mostly, we have been removing curtains and furniture, first thing before the arrival of our window installers, making coffees all day, and generally trying to keep out of the way, which believe it or not is really tiring.

Our poor little cat is a bit distraught with all the noise, and has been sitting in the garden shed in her favourite cardboard box. Unfortunately she is a rescue cat and is therefore very nervous of any visitor to the house unless they are very quiet!

We left the radio on for her and visited her frequently throughout the day with food top ups, and as soon as the guys left she was indoors and on our bed in the evening sun, before we could even hoover the dust away.

I hope to be back to blogland very quickly.

Thank you for visiting, it's nice to know you have been here!

Lots of love,

Barbara xx

Monday, August 24, 2015

A trio of projects

Hello, Dear Reader,

How good of you to drop by.

Today I am linking to Super Mom - No Cape with a trio of stitching projects:
  1. Embroidery - My Cat Doorstop 
  2. Cross stitch - Work in Progress 
  3. Embroidery - Vegetable Bag 


My Cat Doorstop:

Have I mentioned our bathroom has recently been completely gutted and rebuilt? 

Being worried that our new bathroom door might accidentally be pushed open too hard and damage the new tiles, I found a lovely cat pillow pattern on Pinterest by Rebecca of The Crafted Sparrow which I downloaded.  

Whilst enlarging it, both its shape and face changed, albeit only very slightly as I thought it would look more like my own little lady cat! (who can be seen by clicking here)

Rebecca's cat
Rebecca's cat pillow pattern

Pattern before cutting.
My own pattern

My draft for pattern for cat.
You can see the draft for my pattern on the right. 

Last Sunday was a nice sunny day and a fter a lovely walk in the country we were able to eat lunch on our terrace and afterwards I did a little stitching.

A few stitches in the sun!
Al fresco stitching.


Stitching finished!  Luckily it was still sunny for a photo

The whiskers, mouth and eyes were stitched with 6 strands of stranded thread:  in split stitch, french knots at the base of the whiskers and a satin stitch nose.

Marking out the seam line.

I used a measure to mark the seam all round.  Just before I started stitching I decided to draw the seam line all the way round as I have found in the past that it is easy to loose sight of where one is stitching, with the foot of the sewing machine in the way, especially around all the tiny corners!

Drawn seam line, after machine stitching.
I drew the seam line before stitching
I then clipped all round the seam before turning and filling with polyester stuffing. I wished I had stitched a ribbon inside the tail so that it had been easier to pull the tail through the right way, as it was I struggled somewhat!  When I was stuffing the tail I was worried it might need wire to keep it up but it does stay up by itself.

Et voila!
Finished cat!
Finished cat!

She is a little smaller than I expected, and when I was making her I was a little worried that being small she might not do, but I have tested her in situ and she does the job! (I couldn't photograph her behind the door or you wouldn't be able to see her.)

Work in Progress:

I recently mentioned that I don't do cross stitch these days, however I do have this project sitting in my cupboard waiting for me to change my mind and carry on again. The pattern is from The World of Crosstitching - around 2004.  I think I stitched a few stitches the wrong way round and I need to undo them and restitch, not my favourite job.

Cross stitch
I will finish it, one day!

Cotton Chart
I do like to know how long a project has taken.

Vegetable Bag

I am finishing today, with some embroidery I stitched last year. I was tired of carrots rolling around in the salad draw of the fridge and I found this pattern in a book by Mandy Shaw.

If I had seen Super Mom - No Cape's Vintage Pattern Series first her musical carrot would have been ideal!


Embroidered vegetable bag
Yes, there are carrots in there!

Now I have the urge to stitch Sue's Vintage Potato and try out that raised cup stitch.


*********


Do take a look at the other blogs participating in Super Mom - No Cape's Stitchery Party.  There's lots to see.  Such fun!


********


Have a super week whatever you are doing and I will be back next Monday if not before.

Bye for now, Barbara xx

Monday, August 17, 2015

Embroidered Town Ruck and a purse

Hello, dear reader, how good of you to drop in!

*****

Unfortunately my cat doorstop has taken longer to make than I thought, plus everyday things have gotten in the way, so it will be a few more days before I can show you the completed doorstop.

*****

However, today I am joining Super Mom - No Cape's Stitchery Link Party, and would like to show you what I call my Town Ruck and its matching purse.

I've only been embroidering a few years and this was one of my first projects.

I stitched the flap of my bag in Cotton Perlè, there are stem stitches, stab stitches, french knots and sheesha mirrors in the yellowish circles.

The main body was backed with cotton wadding and machine quilted.   Inside, the lining has two pockets, with elasticated tops, one approx 5" square which holds keys/mirror and a smaller pocket (approximately 1" x 5") to hold a pen.

There are also two outer pockets of different sizes on either side, one for my umbrella and the other for a water bottle.  I know it looks a tiny bit lopsided but I wanted to be able to see quickly which pocket held which item, and it seemed a good idea at the time....... it actually does make it easier to remember what is in each pocket!

Front View
Before the cord carrier had been completed.
This picture is the truest colour of the fabric.

Back view
Work in progress.

Work in progress
 Deciding where to fit everything.

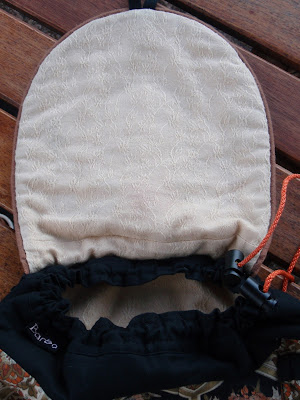
Draw cord and inside flap.
As with many quilters I like to add my signature
 label to most things I make.

The bag is closed by a draw cord, and covered by the embroidered flap (edged with piping) and finally held shut by a hand made, lightly sanded, varnished log button trimmed from a branch of our very own cherry tree!  (Log button made by Darling Hubbie.)

Front of Ruck, showing Al's varnished log button
Complete with varnished log button

As the bag is quite small there is a 6" zip, hand stitched into a side seam to allow easier access.

Finished back.
The bag has removable shoulder straps.
You can also see the carrier loop clearer here.

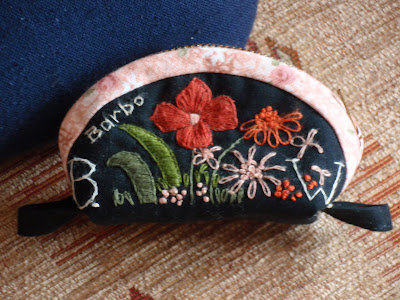
I also stitched this little purse around the same time. The embroidery was stitched in stranded thread.

Matching dumpling purse.
Matching Dumpling Purse - again with "signature".

Dumpling - other side.
The flowers on both sides were stitched to match the
hexagon on the flap, as closely as possible

Ahh, the date on the purse does rather give the game away - and that is when I started my embroidery journey!
******

After finishing this post, I was trying to get to sleep when it dawned on me there is more embroidery which I stitched in the same style, and so here is another photograph. This one too has stem stitch, lots of french knots, chain stitches, small and large sheesha mirrors and satin stitch and was stitched using both stranded cottons and Cotton Perlè. I will be making this into a larger bag to carry my projects to my handicraft classes.

The patterned fabric has a bit of a shine on it,
 would you believe it - too much sunshine!

It is still waiting to be completed, is that a familiar story with you?

******

Assuming you are not visiting me from Sue's linky party, do pop over
 (each and every Monday)
to see what lovely projects everyone else is working on.

The link for:
"Super Mom - No Cape" 
 is at the top of my side bar.


Hope you manage to find time this week for some crafting, 
and that you call by again soon.


Barbara xx


Thursday, August 13, 2015

Homemade Organic Bread - The Recipe

Hello Dear Reader,

This is going to sound a bit cheesy, and I am not bragging about my breadmaking but, last week Darling Hubbie was out on a guided nature ramble in a disused quarry which is rarely open to the public and when they stopped for a break dh discretely took out his oversized homemade cheese roll and started happily munching away.

The Ranger leading the group spotted this from a short distance away and shot over excitedly exclaiming "is that amazing roll homemade, and why does it look so dark and crispy" (no prompting! Honest!)

He was eager to know all about it!   Dh explained to the best of his memory how it was made (ie kneading, rising and baking in the oven).  It turned out the Ranger uses a breadmaker himself but he leaves it in the machine to bake. This has prompted me to divulge my recipe.

In my previous post I mainly talked about my breadmaker and explained how I prepare the dough for rising and eventually for cooking but didn't give details of my recipe, which I highly recommend as it has worked brilliantly every time I use it!

Ingredients:
Water - 360ml
Salt - 10ml
Oil - 15ml (I use Rape Seed Oil)
Soft brown sugar - 25ml (I used Billingtons Demerara sugar)
Flour -600g  ( I used Waitrose Duchy Organic Strong Malted grain bread flour)
Fast action yeast - 7.5ml  (I used Allinson's Easy Bake Yeast)

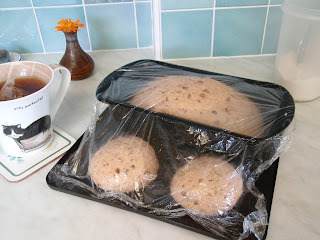
Today I made a medium sized loaf of bread and 2 rolls (see below).

*********

I have amended this post, as I realise, thanks to Catherine's comment, that I missed this part of the process out previously:


As I remove the dough from the machine I turn my oven on to heat to 100 degrees C.   Once it reaches temperature I turn the oven off.

Meanwhile I clean the work surface with very hot water which has a couple of spoonfuls of white vinegar in - antiseptic properties or something, I believe.

I sprinkle a dessertspoonful of bread flour over my squeaky clean worktop and swish the flour about to make sure it covers the actual spot where the dough will be placed.  I rub a little of the flour over my fingers and palms so that when removing the dough from the machine the dough doesn't stick to me or the worksurface.   The dough will be sticky as you remove it from the pan, just keep dipping your fingers in the flour from the worksurface, brushing the excess flour back onto the surface and easing the dough off the pan again. Once the dough is on the floured surface I work the edges into the centre of the dough all round until all the sticky edges have disappeared. I knead for a few minutes. The dough will feel firmer and will be getting drier. I continue working until I think it isn't going to stick to itself anymore. This probably takes about 5 minutes.

As I knead the dough I do add a little more flour to the surface if necessary, bearing in mind too much flour at this stage can spoil the mix of the bread - the flour that is in the dough already has had its gluten worked in the kneading in the machine.

Place the dough in your lightly oiled bread tin, cover with clingfilm (as described in my previous post), cover with a tea towel and place in warmed oven for 30 minutes to rise.

When risen remove from the oven and warm oven to 190 degrees C.  When oven is ready, remove tea towel and cling film, place tin in oven and cook for 30 minutes.

I hope this is not too much information now!

*********

On a previous occassion I used the same mixture to make 8 rolls. My recipe book indicated they should be cooked at 190 degrees C for 15-20 minutes, however we tried this and felt the rolls were too soft, so I now cook them for 30 minutes (still at 190).

Rising Dough
Dough covered with lightly oiled cling film
Bread standing for 5 minutes before being removed from tin.
Allow to stand for 5 mins after cooking
After cooling for 5 mins the bread will be easy to remove from the tin.

Bread cooling.
Cool before covering
Cooked rolls and bread
A crispy crust of bread with organic butter.
Cooked bread.


Once the bread has cooled, I usually leave it on a plate overnight,and cover with a clean tea towel   I find the bread will cut easier the following day.  I then slice the loaf and freeze what won't be used immediately.

I find this breadmaking process quite easy, however I did have a couple of disasters in the early days when I forgot to add the yeast!

*********

I have put Izzy to one side and am working on a cat door stop which I hope to show more of next time.


Barbara xx
Friday, August 07, 2015

Rag Dolls - Izzy

Thank you to everyone who left such lovely comments on my last post, I really appreciate them!  It was so nice to hear from you all!

Today I am revisiting Izzy, who you may have seen loitering at the bottom of my side-bar, annotated as a "Work in Progress". I decided she had been there way too long, so in between visiting other blogs, commenting on them, and some housework, I have added a few more stitches. 

Izzy was an experiment, and I am very pleased how she has turned out. 

I stitched her brows, eyes and mouth in stem stitch, her irises are satin stitch, with a black french knot in the centre, with two little running stitches, in pink, for her nostrils.  


Face - eyes outlined in slipstitch
She now has a face, at last!

Attaching the hair
If you look at this in close up you can see where the
 hairs are attached.
Izzy - showing holes where arms were turned through
The white patches on her arms is where they were turned through

Stuffed Sussex Puff for added hair height
The little brown circle is a stuffed Sussex Puff which I
stitched onto the back of her head to add height to her hair.

Izzy with her streaked hair.
Izzy thinks she is very trendy with coloured streaks in her hair!
Izzy.
I attached a clasp to the top of her head with a ribbon
so that I can attach her to a handbag - yet to be made!

If I made her again these are a few things I would do differently:
  1. make her limbs a little wider - they were awfully difficult to turn through!
  2. add a neck as part of her head.
  3. her face looks a little wobbly around the chin because she was hand stitched, another time I would machine stitch her.
She isn't quite finished. I need to tie her hair back, and I intend to make a dress, some shoes and a bag. Perhaps I might be getting a little carried away!


Did you manage to get any crafting done this week?

I hope you have a great weekend!

See you soon.

Barbara xx

Straw daisies with pollen laden bee
I couldn't resist showing you this photograph of a pollen laden bee!