Saturday, March 19, 2016

Finish it up Friday

Hello Dear Reader,

Mini Thread Catcher Needlecase 


Although we have decorating in progress this week, I have finished my Mini Thread Catcher Needlecase, and wanted to show it off! share with you.

In case you are new my blog, may I say how nice it is to meet you, and you will be able to read more about my "Mini Thread Catcher" in the files of the same name. Briefly, I started with some 1.5" vintage squares and scraps of calico with the intention of making a thread catcher, but, as with many projects, it grew and grew and became a Mini Needlecase!

The lid was the last to be finished, and I wanted it to look like a small quilt (although it isn't actually quilted ..... I couldn't think how to quilt something so small and at the same time I wanted it puffy in order to double up as a pincushion, whilst covering my stitching basket as a lid). There, that's what I should have called it all along .....

"My Stitching Basket!"


Last time I shared pictures of the lid/quilt, I was working out how to mitre the binding round the corners of the tiny quilt, and I feel quite pleased with the result!

Mini Thread Catcher

I am really happy to have finished it, it is so useful, especially when travelling!
Mini Thread Catcher

Mini Thread Catcher
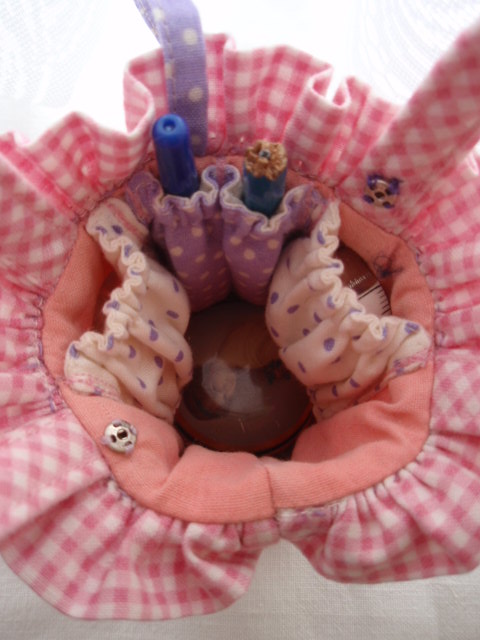
Plenty of pockets!
The lid has about 3 layers of wadding and a square of plastic within, fulfilling two objectives, one to keep the lid in shape and secondly to stop the pins going right through.

Mini Thread Catcher

The only thing missing is my mini matchbook needlekeeper, which fits in the right hand pocket of the lid. I spent a litttle time yesterday knocking one up, but changing the size to fit my needlecase pocket, from a tutorial I found on Pinterest from Calli at Make-it-do.com and I was really pleased with the result.

Mini Thread Catcher

And I just love little things attached to my pincushions. The little heart is useful as a needle rest, making the needle easier to find than when it is hiding amongst the pins.

Mini Thread Catcher

I am really pleased with my needlecase because even my scissors, complete with sheath, will fit nicely into it, keeping them safe.

And there we have it, finished .... unless I think of anything else to add!

Mini Thread Catcher

By the way that is thread across the top of the quilt, not a nasty mark .... didn't notice it was there until I was writing up this post. 

Oh, nearly forgot to mention the basket is approximately 2.5" high, or 6" tall if you include the handles with an 8.5" diameter.

Thank you for visiting me today, and I hope to see you again soon!


Hugs,

Barbara xx


Sunday, March 06, 2016

FNwF - Simple Simon

Hello everyone!

I'm joining Friday Night with Friends (FNwF) over on Cheryll's blog - Gone Stitchin'.

I have been stitching along with The Splendid Sampler by Pat Sloan and Jane Davidson, and you can read more about The Splendid Sampler on their blog -  here.

When I signed up to FNwF I thought I would work on these blocks:

"Happy Happy" - already in progress, and
"Simple Simon" - which I hoped to be able to cut out Friday afternoon, ready to stitch in the evening.

However, next week a decorator is coming in to redo our living room (we used to do it all ourselves but this time round we are having difficulty summoning up the enthusiasm we used to have, plus neither of us are getting any younger!). Although we had already bought the wallpaper, we still had to buy the paint, so to make sure we had the paint ready for the radiators we had to buy it Friday afternoon!

Which meant Friday evening I had to cut the fabric for Simple Simon, and Saturday afternoon I pieced it together. This patchwork malarkey was harder than I had imagined it would be! Happy Happy is still waiting unfortunately.

I have stitched patchwork before - I made a lapquilt - but I found this block a lot harder! Working on Simple Simon my sewing machine really didn't play ball! I had the "Walking Foot" in place, and I found my fabric kept skidding under the needle as I stitched. I had to frog it as I struggled to get straight seams.

I pressed my fabric a few times, and horror of horrors at one point I found I was ironing rather than pressing - that did the block no good at all! - but with a little more pressing it worked out OK, eventually! No way is this a beginner's block! (Not complaining - just saying!)

I suppose it didn't help that I was also stitching a binding around the lid to my Mini Needlecase,  which can be seen top left of the photograph, and working out how to mitre the corners.


Block - Simple simon
Simple Simon

I hope you have had a great evening stitching and I look forward to visiting the other participants of "Friday Night with Friends".

I am so pleased you could join me today, and I will be even happier if you leave a comment to let me know you have visited, then I will be able to make sure I visit you too!

Have a great week!


Hugs!
Barbara xx

Wednesday, March 02, 2016

The Splendid Sampler - A start at last!

Have you seen The Splendid Sampler, organised by Pat Sloan and Jane Davidson? If not you can find details here.

Like many of my blogging friends, I joined up! Then I thought "Just what am I doing!" As if I haven't enough stitching going on! But it's OK - there's no pressure, no-one expects us to keep up. And Pat suggests if we do get left behind, to carry on with the latest block and catch up when we can!

The first block was released on Valentines Day and from then onwards 2 block patterns are being issued each week for 52 weeks (on Sundays and Thursdays).

This is my first block, in progress:

Testing colours!
Block 1

But I decided the green pattern was too busy, and I've changed it to match the outer triangles. The embroidery is nothing to do with the block, by the way, just thought they looked pretty together!

Finished 1st block!
Finished!


As each block is issued there are links to tips on how to stitch them.

I have to admit I have appliqued the heart in the method I'm used to, which means that I make a template, cut my fabric adding a seam allowance, stitch a running stitch around the edge of the heart, pull the stitches tight around the template, press the fabric, leave overnight to "set", then stitch onto the background with very tiny stitches.


On Friday evening I will be sorting fabric and hopefully making more blocks for my Splendid Sampler Quilt, and then later joining in with Friday Night With Friends (FNwF) over on Cheryll's blog to show what I've stitched.

See you again soon!


Hugs,
Barbara xx

Edited to add:
Linking to Esther Aliu's WIPs on Wednesday Link Party