Monday, May 29, 2017

Gifted Gorgeousness and a Catchup!

Hello!

Late again!

I'm linking to Jo (of Serendipitous Stitching) for May's Gifted Gorgeousness ..... just in time!

~

My blogging friend Christine of The Mulberry Mouse (formerly blogging as UK City Crafter) very kindly sent me this sweet brooch, which she had crocheted, and the pretty ribbons. (For a link to the daffodil pattern, by Lucy of "Attic 24", visit Christine's blog by clicking HERE)

It was lovely to wear Christine's brooch to my handicraft group, where it got many complements!

Lovely gift from Christine

And, as it happened, Christine's yellow ribbon was just what I needed to make sure I keep track of my teeny travel scissors, and added a sweet 'pop' of sunshine to my newly finished Sewing Kit (which started as an inkling of an idea HERE, progressing HERE, and finishing HERE).

Travel Sewing kit - back
Travel Sewing Kit - Back
Travel Sewing Kit - front
Travel Sewing Kit - Front 

********

It's been a few weeks since you've seen my cross stitching, and as these three projects qualify for Gifted Gorgeousness too, here they are!

The first was a present from Jacquie of "My Journey"

Stitch by Stitch (Anchor kit)
"Stitch by Stitch" - Anchor 

The next two are my travel projects, but as I've been suffering with a cold that has turned into a horrid cough we haven't been travelling much lately ..... so not much progress. However, the last time I was travelling I finished the frame and started stitching some of the lilac stitches on Butterfly.

Heritage kit - Butterfly
Butterfly - Heritage kit
(A present from family)

The pattern for the beehive says this takes 5 hours to stitch, and despite the fact that I only stitch a little here and there, I would say this is taking at least five times that!  It's tiny, and has lots of half stitches!

Beehive progress
 This was a free gift in a magazine!

There's only a couple of bees to stitch .... then it's on to the backstitching 

Thank you for dropping by! I'm off to catch up on reading everyone's blogs!

Have a great week!


Hugs,
Barbara x


Saturday, May 20, 2017

Mini Quilts - Binding

Yay! I have a finish! Well, two actually. The first being my experimental block, and the second, a Mini quiltlet I stitched yesterday evening, to go in the blank space between the washing line posts on my experimental block!

*********

To recap, some of you may recall that in March I took part in Jen & Jan's Mini Blog Hop QAL - "Laundry Day", but I didn't quite finish my Mini Quilt!

I hadn't been quilting long, and was nervous that if I rushed to finish I would later be unhappy with my quilting, and the same with the binding!

I've finished many purses and bags in the past with bound tops, but my first experience of a mitred corner was on a pincushion that I made for my favourite needle case - click here.

In order to work out how I wanted to quilt my "Laundry Day" block I made a practice block which you can read about here. And as all quilters name their quilts I've now decided this one should be called "Practise makes perfect!"!

Binding, and mitred corners


Although I've seen many tutorials They never really gave me that "lightbulb" moment, and even as I stitched my practice quiltlet I wasn't quite convinced that I was stitching the mitred corners correctly!

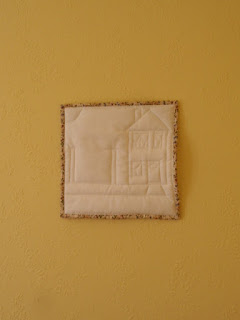
"Practice Makes Perfect"
 Finally ..... on the wall! 

"Practice Makes Perfect"

"Practice Makes Perfect"
 Another use for a branch from our old cherry tree! 

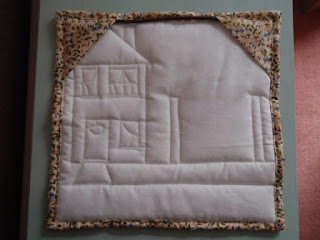
The triangles on the back are there to hold the cherry branch, for hanging.

"Practice Makes Perfect"
I think you can see the branch
 better here! 

And here is my "Mini" quiltlet:
Finishing at 9.5 cm square (3.75" approx).
The mini binding finishes at approx 0.5 cm (width)

"Practice Makes Perfect"

Mini quilt
Not quite finished ..... still a couple of pins in the binding

Mini quilt - back
You can see my quilting on the back,
stitched "In the ditch"
Mini binding
About to mitre the corners
Mini binding
I was so pleased with this join! It went
together like clockwork! Really neat!
Mini binding finished

This was the third project I've made in a row with binding, and I was really pleased with both the speed I was able to bind the Mini quiltlet, and, the actual finish. 

I had intended making a tutorial for binding a quilt ..... it took me ages to find a method that worked so well, and then, today, I bought a quilt magazine, and there ..... was a tutorial for binding ..... but it wasn't quite the way I did it, so maybe I might write one for me anyway!

After all ..... I'm bound to forget how I did it if I don't make notes!!!!!


*********

And just because we were out walking ..... and I couldn't resist taking some pictures of the pretty blossoms, and the lovely blue sky.

Hawthorn flowers

Hawthorn


Thank you for visiting!

I hope the weather is treating you all well, and that you've had time for some stitching this week! 

I'll be visiting blogs tomorrow, it's time for bed now! Goodnight all.


Hugs,
Barbara xxx


Linking to Amanda Jean's "Finish it up Friday" at Crazy Mom Quilts.

Saturday, May 13, 2017

Finish It Up Friday! - A post full of "Mini's"

Hello,

You might have seen my previous posts where I have been contemplating what to do with some 1.5" vintage squares in my scrap collection ..... (if not see my previous post).

Well ..... Yay! .... today here is my Mini Travel Kit finished!

"Weighing In" at approximately 3.5" x 4.5"(9 x 12 cms), 
with a Mini Pincushion, approximately 1 3/4"(4.5 cms) in diameter.

I also used quite a few larger pieces from my Vintage Scrap bag.

Front
Front view - Mini Sewing Kit
Ta -dah! Complete with Mini pincushion!

Back
Back view - Mini Sewing Kit
And, here's a Mini  home made button!

I am sure you will be able to see the "secret method" I have employed to attach to whichever handbag I happen to be using!!!

Front - Mini Sewing Kit
..... pockets empty .....

Oh, and did I say? .... that large creamy expanse in the middle ..... might some day be a suitable place to add an embroidered name tag ..... and, darn it, that reminds me I haven't added a label!

Working on a Mini Pincushion
.... and, full again!
Mini pincushion in progress, in foreground   

I couldn't finish without a photo of some of the wild (Mini) strawberry flowers in our garden, complete with Mini bee (please ignore the other wild plants in the view).

Mini Bee and Wild Strawberry flowers


*********

Thank you so much for visiting, do come again!

I hope you are having a super weekend.


Hugs,
Barbara xxx


Linking to:
Crazy Mum Quilts for "Finish it up Friday"
and Quilting is more Fun than Housework for "Oh Scrap"

Sunday, May 07, 2017

FNWF - Travel Sewing Kit

Hello folks!

Friday evening I stitched along with Friday Night With Friends at Cheryll's place.

I have been meaning to make something with some of my vintage 1.5" sample squares and I had been considering how I could turn them into some sort of mini travel sewing kit.

I thought 3 squares stitched together would make two pockets suitable for carrying needles, needle threaders, bobbins of cottons and other tiny items (hexie papers, buttons, etc).

Previously I had stitched a seam around the lower three squares, turned it through to see how it looked, then decided the pocket would be more secure if the edges were stitched into bound edges.

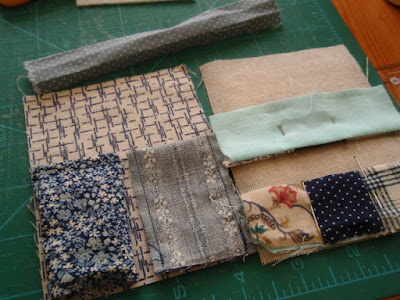
Vintage blocks

Friday night I cut all the pieces, but as we had been out all that day I didn't have time to stitch!

Fabrics Prepped

I thought  I'd be able to stitch them all together the next morning, and have a finish! Silly me, I always underestimate how long it takes to make my little stitchy things!!!


But there has been progress .... both sides are now ready to stitch together, although I still need to think of some type of teeny pincushion ..... and maybe it needs a little decoration.


I must leave you now, visitors arriving soon, and housework outstanding! Have a great week!

Thank you Cheryll for organising the party!

See you soon!


Hugs,
Barbara xxx