*********
To recap, some of you may recall that in March I took part in Jen & Jan's Mini Blog Hop QAL - "Laundry Day", but I didn't quite finish my Mini Quilt!
I hadn't been quilting long, and was nervous that if I rushed to finish I would later be unhappy with my quilting, and the same with the binding!
I've finished many purses and bags in the past with bound tops, but my first experience of a mitred corner was on a pincushion that I made for my favourite needle case - click here.
In order to work out how I wanted to quilt my "Laundry Day" block I made a practice block which you can read about here. And as all quilters name their quilts I've now decided this one should be called "Practise makes perfect!"!
In order to work out how I wanted to quilt my "Laundry Day" block I made a practice block which you can read about here. And as all quilters name their quilts I've now decided this one should be called "Practise makes perfect!"!
Binding, and mitred corners
Although I've seen many tutorials They never really gave me that "lightbulb" moment, and even as I stitched my practice quiltlet I wasn't quite convinced that I was stitching the mitred corners correctly!
 |
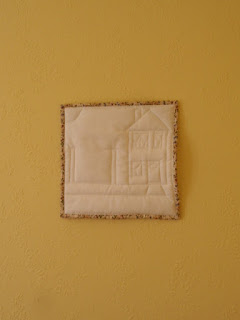
| Finally ..... on the wall! |
Another use for a branch from our old cherry tree!
|
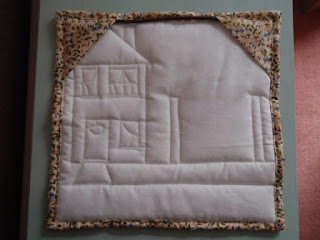
The triangles on the back are there to hold the cherry branch, for hanging.
 |
| I think you can see the branch better here! |
And here is my "Mini" quiltlet:
Finishing at 9.5 cm square (3.75" approx).
The mini binding finishes at approx 0.5 cm (width)
 |
| Not quite finished ..... still a couple of pins in the binding |
 |
| You can see my quilting on the back, stitched "In the ditch" |
 |
| About to mitre the corners |
 |
| I was so pleased with this join! It went together like clockwork! Really neat! |

This was the third project I've made in a row with binding, and I was really pleased with both the speed I was able to bind the Mini quiltlet, and, the actual finish.
I had intended making a tutorial for binding a quilt ..... it took me ages to find a method that worked so well, and then, today, I bought a quilt magazine, and there ..... was a tutorial for binding ..... but it wasn't quite the way I did it, so maybe I might write one for me anyway!
After all ..... I'm bound to forget how I did it if I don't make notes!!!!!
*********
Thank you for visiting!
I hope the weather is treating you all well, and that you've had time for some stitching this week!
I'll be visiting blogs tomorrow, it's time for bed now! Goodnight all.
Hugs,
Barbara xxx
Linking to Amanda Jean's "Finish it up Friday" at Crazy Mom Quilts.


20 comments:
Hi Barbara,love your mini quilt ,well done xx
Good work! Congratulations on conquering the mitred corners. Yes, DO write a tutorial for your way of mitering corners. It is always good to have a reminder.
Great mini finishes Barbara. The corner pockets are a really neat way of hanging small projects and I love the 'button' in the top left corner. xx
Wow, that's fab! Closing the binding on something that small must be a real pain, I find even mug rugs difficult!!!!
Beautiful finishes Barbara! Your binding looks great, so I hope you remember the method! Christine x
Thank you for your words of encouragement, Queenie.
It wasn't too bad. Now I have discovered a method that works for me, the job is so much easier!
Barbara x
Thank you, Christine! I will write a tutorial to remind myself!
Barbara x
The binding and corners look fine Barbara, I always forget how to do the mitred corners. Love the heading.
Not only did you stitch a mini quilt, you made it 3D. Love it!! AND I have never seen triangles on the back before used for wall hanging. This is a sweet project.
xx, Carol
My mind boggles at even the thought of making such a teeny tiny quilt! Mitered corners elude my best efforts too and obviously I need a whole lot more practice (and taking notes might be a wise thought too!!).
Your mini quilt looks lovely, however you did it!
Gorgeous stitching,I love your mini quilt it is beautifully made
Your Mini Quilt is adorable. Sweet house and the mini quiltet looks perfect hanging on the line. How on earth did you stitch such a tiny quilt?? You have done an amazing job. I too have read many tutorials on binding. Like you I haven't had that light bulb moment. I look forward to seeing your tutorial, Barbara.
How lovely! Such pretty work on a tiny scale! :-)
Oh my, Barbara, such a cute little mini quilt. And as I can see a lot of work went into it. You were doing an amazing job.
More beautiful makes, Barbara, and I love the new header as well. You are all set for summer :-)
Amalia
xo
A wonderful miniquilt! I like the star quilt hanging outside the house. Very cute! Great flower pictures, and beautiful picture in the heading of your blog) :-)
That's a beautifully stitched binding! I find this mini star quilt simply adorable.
That must have been scary but also reassuring that the police were there so quickly.
I don't quilt and don't understand a lot of the terms but your blocks look gorgeous to me!
ลาลีกา
Post a Comment