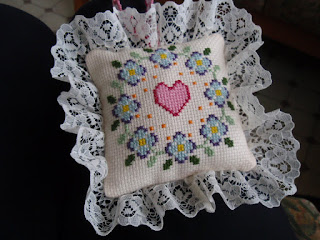
For the first time, I am linking to Jo's "Gifted Gorgeousness", with this pot pourri sachet which I stitched for Jo's Secret Stitching Sweetheart blog hop.
"Gifted Gorgeousness" is a monthly link party run by Jo of Serendipitous Stitching. We can link up each month from the 15th until the end of the month. If you would like to find out more and maybe join up go HERE!
This sachet was a magazine gift from waaay back ..... which I loved when I bought the magazine but somehow never got round to stitching until now!
I was feeling very dubious about trailing the orange cotton behind the fabric for the single orange stitches, and then I remembered that a couple of month's ago, just before I started this project, I had read about the Pinhead Stitch over on Queenie's Friday Homework.
Queenie of "Queenie's Needlework" shared a link to a tutorial for stitching on evenweave, which you can see by clicking HERE.
I didn't see any tutorials for working the stitch on aida, but I found it does work! So I thought I would make a record of how I stitched it so in future I would know exactly what to do!
**********
Pinhead Stitch Tutorial
 |
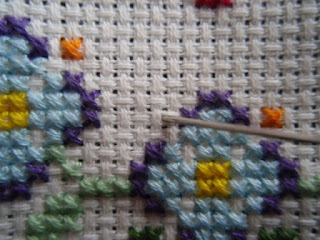
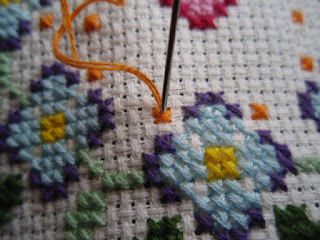
| Bring your needle up on the right of the square you want your stitch to appear in ..... keeping hold of the end of the thread beneath your work |
 |
| then down again in the centre ..... |
 |
| Sometimes the Pinhead stitches sit lower in the fabric than this..... |
When I first started using Pinhead Stitch I was concerned that the stitches would not be hidden by the Cross Stitch ....
 |
| ..... but, as you can see in this picture the Cross Stitch has hidden the Pinhead Stitches |
 |
| then finish off by bringing the needle up at the top of the square ..... |
 |
| ..... down in the middle ..... |
 |
| ..... up at the bottom ..... |
 |
| ..... and down again in the middle. |
 |
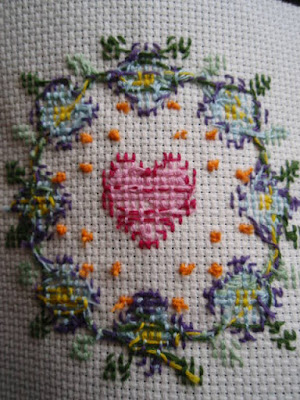
| Oh yes ..... this view shows how the stitches will sometimes sit lower in the fabric |
I found it easiest to snip the ends off after completing each stitch, but not too close to the fabric ..... just in case!
I'm hoping I won't be washing this stitching at any time. However, I really need to test the Pinhead Stitch on a sampler first to see if it will survive washing. I will give you an update later.
***********
Funnily enough the week before I finished this sachet I had a visit from my mum and sister. They had popped into a local sewing shop during the week, and as soon as they saw this pretty ribbon they thought of me ..... and look .... it was just what I needed to finish my sachet!
I guess that means this also qualifies as a FFO (Fully Finished Object)!
*********
Ohhhh! I've just remembered ..... At the weekend I was washing and ironing some aida from a stitching kit ready for a new project ..... and the kit was a present from another blogger!!!! So next month I just might have some more stitching to share with Gifted Georgeousness
If you'd like to have a look to see what Gifted Georgeousness others are sharing pop over to Jo's and see who has linked up this month by clicking HERE
Maybe you've used Pinhead Stitch yourself .... do let me know if you have ..... and did you like it ..... did it work on your project?
Thank you for popping by, and an especially big "Thank you" to all for visiting and commenting on the blog hop this week, I hope you had fun!


19 comments:
Thank you very much for the clear photos of the pinhead stitch. I'd heard about it but it's much easier to understand with clear photos!
Your sachet is so sweet. I've started carrying a project round in my handbag, it's surprising just where a few stitches can be squeezed in!
Thanks for taking part in GG this month and thank you for the gift of a clear tutorial! This looks like a very useful stitch to learn. Your little pillow is so pretty too. Now we need a tutorial to show us how to get the lace looking as good as your's does!
That's an excellent tutorial, so clear and easy to follow. THANK YOU! I hope the Pinhead stitch will be used by all your readers.
I have not tested how 'washable' the Pinhead Stitch is, but any embroidery should be washed with care, just soaked and gently handled, so I think your work might be ok.
Keep up the good work, Barbara.
What a lovely sachet - thank you for the Pinhead Stitch instructions, now I understand it and will be trying it the next time individual stitches are required.
Great photos of Pinhead stitch, I've used it before as well, it's so helpful for those out of the way single stitches.
Great tutorial and beautiful finished project!
Beautiful little sachet Barbara and nice to have learned a new stitch... thank you for sharing the tutorial! Enjoy your weekend! Christine x
Pretty sachet and great tutorial.
I've never heard of this Pinhead stitch before. I admit I would be worried about unraveling. My threads travel all over the place on the back of my work. Not pretty, but very secured. lol
Your little sachet is quite lovely and the ribbon is the perfect complement! Thanks for this interesting post. Have a nice Sunday!
Same as France, I have never heard of this stitch before.
Your tutorial however was really clear and helpful :)
A lovely finish too!
That's an interesting stitch for working single stitches. I usually work them individually and go under the stitch on the back a couple of times, but I'm always afraid my stitches will come loose. I might have to try this stitch :)
Your finish is lovely! Have a wonderful week!
I've often wondered how to work single stitches without carrying the thread across the back...this is a perfect idea! Thank you for the how to. And your little cushion looks so pretty!
Thanks for the tutorial. I had even not known that such a stitch exists. It is always a pain to have these single stitches somewhere in the design. As long as they are stitched worthwhile it doesn't matter as you don't see it when you carry the thread across behind the fabric. but wit a darker thread it's completely different. Next time I'll try that new to me stitch.
A great little finish indeed.
Thanks for sharing, the pictures definitely helped!
I have never heard of this stitch before Barbara and it will certainly come in useful, thanks for the tutorial. Pretty sachet.
Such a clever use of the pinhead stitch. I only use it for long and short stitch, but it looks good on the aida too.
That kit goes waaaaay back! I've still got the magazines, and use the binder that came with the series to keep my patterns in, but haven't actually made up the kit.
Hi Penny, Wasn't able to comment on your blog, hope you look back here!
Thank you for your comment! I recommend you stitch the kit, it was more fun than I had anticipated.
Re your post on Coloris colours .... Very useful information! Thank you for your work here! Have you seen Sheryl's latest post where she has used Coloris and I guess she has used complimentary colours!
http://sewingafterseven.blogspot.co.uk/2017/02/smalls-sal-check-in-february.html
The sachet is beautiful. I have used the pin stitch and find it very useful for using of number of threads
Post a Comment