Hello Dear Friends,
"Et Voila" .... my "Curry Dye Job" as dear Josie (of Sew for Soul) called it!
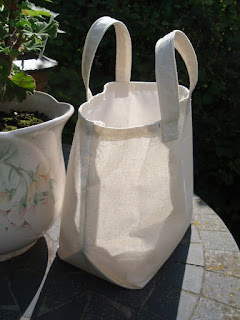
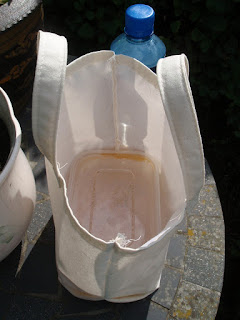
Previously my little Take Away bag looked like this:
but it looked sooooo white, and you know, if it is going to be used it won't stay this colour for long! So I asked everyone what they would do to decorate it!
Thank you all your wonderful ideas my friends, and they are all great ideas!
But in the end I was really really tempted by the idea of experimenting with Turmeric Dyeing.
I wasn't sure where to start! I've read lots of blogs where people have documented their experiments with dyeing fabric but, of course, I don't exactly remember who they were to find those notes again!
So ...... I Googled "Fabric Dyeing with Turmeric" and found an article by Becky Striepe (of Glue and Glitter.com) on "Crafting A Green World", an Eco Friendly Craft site.
Well, I was hooked ..... for two reasons ......
firstly, because Becky's beautiful lacy yellow handkerchief looked so pretty,
and, secondly, because it is an environmentally friendly method of dyeing, and I am soooo into saving the planet!!
So, on a sunny morning last week I decided to have a go!
Warning: Don’t forget, if you try this, Turmeric really stains, be careful to wipe up any spillages immediately!!
I followed Becky's method of using a Mordant (although I've since read elsewhere that Turmeric doesn't need one) of salt (2oz) and water (1 litre), boiling the fabric in the liquid for an hour,
and then, in a clean pan .....
bringing a mixture of turmeric (2 x 15ml) and water (1/2 litre) to the boil, simmering for 15 minutes.
Turning off the heat and immersing the fabric (I used pre-washed Calico).
Becky suggests checking the colour of the fabric after 10-15 minutes, but mine soaked for around 45 minutes (while we stopped for lunch!)
 |
| No, this wasn't lunch! Tee hee! |
At this stage the fabric was this gorgeous colour:
 |
| Oops this photo is a little darker than I realised! |
Becky's instructions said to rinse in water until the water ran clear, but maybe I rinsed it too much as I lost that rich colour!
I hung all the fabric out on the washing line but, maybe that was wrong ..... it was sunny, maybe that faded the colour.
 |
| You can see from this photo it just looks like a paper bag now, instead of my lovely dark yellow! |
Have any of you had any experience of dyeing with Turmeric?
Do you know if I've missed a step, or was there anything else I could do to keep its colour?
Stop Press:
We went out for a curry a few days later and were laughing with one of the restaurant's owners, showing her the Take Away bag I'd made, before we had our meal, and telling her that if we had ordered more than we could eat we would be using my own take away boxes and the home made bag I had brought with me to take any extra away!
In the event we finished everything ..... so we ordered more to take away. I should have asked them not to heat the take away food as were going to save it for later (or possibly freeze the food) because when it came out it was too hot to put in the bag ..... but what I was trying to say was that we have used my bag (and it hadn't shrunk with all the washing) and the boxes were absolutely as full as they could be!!!!!
But even then we had to ask them to take back their paper carrier bag, and the plastic bag they had also put the food in because I really was going to rely on my Curry Dyed Take Away bag!
And we made it home with no spillages at all! Yay me! The Eco Warrior!! Tee hee!
But even then we had to ask them to take back their paper carrier bag, and the plastic bag they had also put the food in because I really was going to rely on my Curry Dyed Take Away bag!
 |
| Oooh, that's Tarka Dhal in t here! But don't look at the loose threads - after all, this bag was only meant to be a prototype ..... at first! |
Sorry, I just had to say!
Ooooh, just to summarise: I am really pleased with this little project! The take away boxes fitted in perfectly (well, it was "made to measure" after all!). Although I was excited with the mustard colour, it disappeared during drying and probably that was no bad thing after all ..... now it does look much like a paper bag, so I won't feel too conspicuous carrying it home. (I'm sure I will be reheating the left over turmeric dye for another bag!!)
As this was the first time I have attempted Fabric Dyeing I am linking to Fiona's blog - Celtic Thistle Stitches for her "New to me" blog party.
I know most of us use fabric bags for shopping these days but do you go further? For example, when we eat out the staff want to give us new serviettes with each course, does this happen to you, and do you stop them? I do.
I'm on the look out for shops that do more to stop the waste. We have one opening nearby soon. I understand they weigh bottles before they are filled so they know how much to charge ...... but I haven't been there yet!
I always take a bag for my bread, so I don't have to take the shop's paper bags, and I wash out plastic cereal bags and re-use them or the bags I've made when shopping ...... but really isn't it time manufacturers did their bit too and change to eco friendly packaging.
Why is it taking them sooooo long?
Hugs,
Barbara xxx
Ooooh, just to summarise: I am really pleased with this little project! The take away boxes fitted in perfectly (well, it was "made to measure" after all!). Although I was excited with the mustard colour, it disappeared during drying and probably that was no bad thing after all ..... now it does look much like a paper bag, so I won't feel too conspicuous carrying it home. (I'm sure I will be reheating the left over turmeric dye for another bag!!)
As this was the first time I have attempted Fabric Dyeing I am linking to Fiona's blog - Celtic Thistle Stitches for her "New to me" blog party.
----------
I know most of us use fabric bags for shopping these days but do you go further? For example, when we eat out the staff want to give us new serviettes with each course, does this happen to you, and do you stop them? I do.
I'm on the look out for shops that do more to stop the waste. We have one opening nearby soon. I understand they weigh bottles before they are filled so they know how much to charge ...... but I haven't been there yet!
I always take a bag for my bread, so I don't have to take the shop's paper bags, and I wash out plastic cereal bags and re-use them or the bags I've made when shopping ...... but really isn't it time manufacturers did their bit too and change to eco friendly packaging.
Why is it taking them sooooo long?
Hugs,
Barbara xxx

